|
Battle of Wadi Akarit
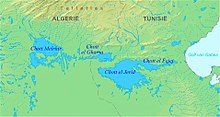
The Battle of Wadi Akarit (Operation Scipio) was an Allied attack from 6 to 7 April 1943, to dislodge Axis forces from positions along the Wadi Akarit in Tunisia during the Tunisia Campaign of the Second World War. The Gabès Gap, north of the towns of Gabès and El Hamma, is a passage between the sea and impassable salt marshes. The 51st (Highland) Infantry Division breached the defences and held a bridgehead, allowing the passage of their main force to roll up the Axis defences. After several determined counter-attacks, the Axis forces withdrew and the Eighth Army, under General Bernard Montgomery, pursued toward Tunis, until reaching Axis defensive positions at Enfidaville. BackgroundAfter the Mareth Line in southern Tunisia had been outflanked in Operation Supercharge II, through the Tebaga Gap, Axis forces had withdrawn to the Wadi Akarit, north of Gabès. This position had been identified long before by Erwin Rommel as a good defensive position with secure flanks and a short supply route to Sicily. Rommel had wanted to withdraw there after the Second Battle of El Alamein, as it was the best place to resist the Eighth Army and prolong the Axis presence in Africa. With the British held at Wadi Akarit, all available troops in Tunisia could repulse the First Army (nominally British but with American and French units under command) to the west, before dealing a similar blow to Montgomery.[1] The Gabès Gap was the last readily defensible position before the Eighth Army reached Sfax and formed a continuous front with the First Army advancing from the west.[2] PreludeWadi Akarit lay on an east–west line, from the Mediterranean Sea in the east and the impassable salt marshes at Sebkret el Hamma (the east end of the Chott el Djerid) to the west. There were no flanks to turn as there had been at the Tebaga Gap and no opportunity to disperse the defenders by attacking at several points, as at the Second Battle of El Alamein; a frontal attack on prepared defences was unavoidable.[3] From the coast, the defence line followed Wadi Akarit for 5 miles (8.0 km), which was impassable to armour and then a wider section of dry wadi, backed by a long hill, Djebel er Roumana, the last of a line of high ground that forms the northern boundary of the Chott. The approaches to Djebel er Roumana were obstructed by an anti-tank ditch and there were more defence works to the west, although the broken ground was a significant obstacle.[4] Battle Chott el Djerid area. Allied advance units had advanced through Oudref and reached the Wadi Akarit on 30 March but limited their activity to patrols and probing the Axis defences. Three divisions were chosen for the initial assault: 51st (Highland) Infantry Division on the right, 50th (Northumbrian) Infantry Division in the centre and the 4th Indian Infantry Division on the left.[5] In the week before the battle, British and American bombers began round-the-clock attacks on the defenders.[6]
 Men of the Green Howards storming Point 85 during the battle. Instead of attacking between Jebel Fatnassa, a steep 800-foot (240 m) hill and the junction with the 50th (Northumbrian) Division, Major-General Francis Tuker, the 4th Indian Division commander, persuaded General Montgomery to attack Jebel Fatnassa using infantry trained in mountain warfare. Jebel Fatnassa was defended by the Italian XXI Corps with troops of the 80th Infantry Division La Spezia, the 101st Motorised Division Trieste and the German 164th Leichte Afrika Division.[7] The Fatanassa feature was taken and the 4th 6th Rajputana Rifles advanced as far as the plain behind the hills nearly 5 miles (8.0 km) beyond, taking 2,000 prisoners. The 4th Indian Division was not able to exploit the success further, because the British X Corps was held up by German counter-attacks.[8]  Generale Giovanni Messe The 50th (Northumbrian) Division met determined resistance from Italian marines, well dug in at Wadi Akarit and plentifully supplied with automatic weapons and grenades but the British pressed forward, despite high casualties among the 6th Battalion, Green Howards; two senior officers, six senior NCOs and junior officers and 118 other ranks were killed.[9][10]
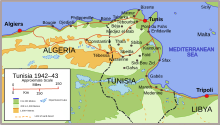
The Green Howards took Point 85 and held it against counter-attacks. The 1/4th Battalion Essex Regiment of the 4th Indian Division made contact with the 50th (Northumbrian) Division on the right flank and helped them to cross an anti-tank ditch.[11] The 51st (Highland) Division attacked with the 152nd Brigade and seized the top of Roumana, then made a gap through the minefield and the anti tank ditch on the left flank. The 153rd and 154 brigades attacked the coastal defences and took 2,000 prisoners.[12] A battalion of the 101st Motorised Division Trieste was destroyed and prisoners were taken from the 90th Light Afrika Division, one regiment of which counter-attacked at 9:00 a.m. and caused a short delay before being repulsed.[13] 1st Italian Army counterattack Queen's Own Cameron Highlanders storming the heights of Jebel Ramauna at the Wadi Akarit (Art.IWMARTLD3404). Messe ordered the 164th Leichte Afrika Division to move from the position in the western hills to the centre and in the afternoon sent the 15th Panzer Division to join with the 90th Light Division and counter-attack the 101st Motorised Division Trieste positions captured by the 51st (Highland) Division. The 15th Panzer Division arrived just before the British tried to exploit their success and counter-attacked. (The 10th and 21st Panzer divisions, which had been opposite the US II Corps during the Battle of El Guettar were also moved towards the British attack.)[14] Three German counter-attacks were made during the afternoon, mainly against the 51st (Highland) Division on Djebel Roumana, against positions held by the 7th Battalion, Argyll and Sutherland Highlanders, who repulsed the attacks.[15] As dark fell, the Axis position had become untenable, the defenders having been severely depleted. Messe reported the situation to Hans-Jürgen von Arnim; Albert Kesselring and the Italian command in Rome urged the army group commander to continue the battle but Arnim ordered a retreat to the Enfidaville position, about 150 miles (240 km) to the north.[16] Axis retreatThe 2nd New Zealand Division and 1st Armoured Division began a pursuit across the coastal plain, which changed from semi-desert to olive groves which offered opportunities for ambush. There was little resistance until close to Enfidaville and about 6,000 prisoners were taken, sometimes surprised to see Allied troops beyond the supposed front line and large amounts of material (including captured American supplies) were taken.[17] AftermathCasualtiesAt dawn on 7 April, it was found that the Axis forces had quietly withdrawn. The 15th Panzer Division had suffered many losses, the 164th Leichte Afrika Division had lost most of its weapons and vehicles and at least three Italian divisions had to be amalgamated into one unit; the 80th Infantry Division La Spezia was reduced to 1+1⁄2 infantry companies, the 101st Motorised Division Trieste to three weak battalions and the 16th Motorised Division Pistoia and the 90th Light divisions had many casualties.[18] The strength of the 1st Army had been 106,000 men, of whom 7,000 prisoners had been taken.[19] The Eighth Army had 1,289 casualties and lost 32 tanks.[20] Subsequent operations Sketch map of Tunisia during the 1942–1943 campaign At El Guettar, the II US Corps operation to cut off Axis forces during the Wadi Akarit attack had been held up but the retirement from Wadi Akarit forced the Italians to withdraw. On 7 April, the Americans raced down the El Guettar–Gabès road, where it met advanced troops of the Eighth Army at 5:00 p.m.[21] Alexander moved the II US Corps to the north, because the Eighth Army was better prepared for the final offensive.[22] The pursuit covered 140 miles (230 km) north of Wadi Akarit, Sfax and Sousse were captured. The Axis troops fell back to defensible positions north and west of Enfidaville, 25 miles (40 km) south of Cape Bon. The mountains descend to the sea, with a narrow passage to Hammamet. The area was held until the Axis surrender in North Africa and Eighth Army units were moved towards Medjez el Bab opposite Tunis, for the final operations of the Tunisian Campaign.[23][24] Order of battleBritish Eighth Army(Allied units taken from Playfair et al. (1966) unless indicated)[25]
Italian 1st Army(Axis units taken from Playfair et al. (1966) unless indicated)[28][a]
Notes
See also
Footnotes
Bibliography
Further reading
External linksWikimedia Commons has media related to Battle of Wadi Akarit.
|
||||||||||||||||||||||||||||||
