|
Operation Wilfred
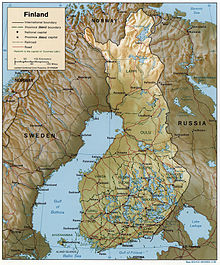
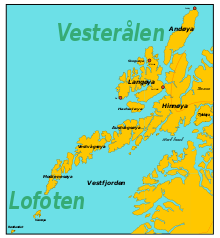
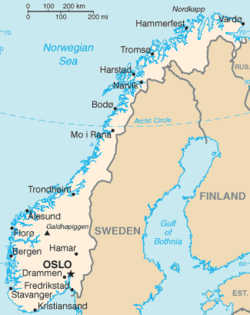
Operation Wilfred was a British naval operation during the Second World War that involved the mining of the channels between Norway and its offshore islands to prevent the transport of Swedish iron ore through neutral Norwegian waters. The Allies assumed that Wilfred would provoke German retaliation in Norway and prepared Plan R4 to occupy Narvik, Stavanger, Bergen and Trondheim. On 8 April 1940, the operation was partly carried out but was overtaken by events, when the Germans began Operation Weserübung on 9 April, the invasion of Norway and Denmark, which began the Norwegian Campaign. BackgroundBritish plans Map of the Gulf of Bothnia The British War cabinet expended considerable energy on plans for land operations in Scandinavia during the winter of 1939–1940. The Winter War (30 November 1939 – 13 March 1940) between the Soviet Union and Finland could be used as a pretext. The deputy permanent under-secretary at the Foreign Office, Orme Sargent, wrote
and advocated the seizure of the Lapland iron ore fields to prevent a Finnish defeat and German control of Sweden.[a] German iron-ore imports from Sweden were about 20,000,000 long tons (20,000,000 t) in 1938; about 9,000,000 long tons (9,100,000 t) had been denied Germany by the Allied blockade since 1939. In the summer the ore was sent from Luleå in the Gulf of Bothnia but the winter ice closed this route and ore was sent instead by rail to Narvik, for shipment to Germany.[3] At the Admiralty, Winston Churchill, the First Lord of the Admiralty, wanted an offensive policy, particularly after the Altmark incident (16–17 February 1940). British ships had entered Norwegian territorial waters to rescue merchant sailors being held on Altmark and taken to Germany after being taken prisoner when their ships had been sunk by the heavy cruiser Admiral Graf Spee. On 20 February 1940, Churchill ordered the Admiralty urgently to prepare a minelaying plan which "being minor and innocent may be called Wilfred".[4][b] Churchill thought that a landing in Norway, without Norwegian acquiescence, was a mistake, even if there was no more than a minor exchange of fire with the Norwegian army. Churchill held that laying mines in the Indreled (Inner Leads) in Norwegian waters, could be done without a confrontation with the Royal Norwegian Navy (Sjøforsvaret). The War Cabinet and the Ministry of Economic Warfare hesitated to support hostilities in Norwegian waters, because of the effect that they could have on British imports from Norway and Sweden. On 29 February, the prime Minister, Neville Chamberlain, decided to wait and see.[4] Landing plans Despite the uncertainty, the Allied army high commands worked on plans for land operations in Scandinavia. In Operation Avonmouth, three battalions of Chasseurs Alpins and a British infantry brigade, with three ski companies attached, were to land at Narvik and advance along the railway to take over the iron ore fields in Lapland. The French chasseurs and Foreign Legionnaires were to continue east towards Finland but keep away from the Red Army and risk being cut off by a German force when the ice in the Gulf of Bothnia thawed.[6] Operation Stratford, was a plan for five battalions of British infantry to garrison Stavanger, Bergen and Trondheim to deny the Germans bridgeheads. In Operation Plymouth three divisions were to stand ready to cross to Trondheim to aid Sweden if the Swedish government requested it. French ships and troops assembled in the French Channel Ports and Brest. Up to 100,000 British and 50,000 French troops with generous air and naval support might participate, the main effort being in Norway, with 10,000 to 15,000 troops advancing into Finland. German counter-landings were expected in southern Norway up to Stavanger. The latest date that the Gulf of Bothnia could be expected to remain frozen was 3 April.[6] The French view was that an operation in Scandinavia had many advantages it would divert German troops from the Maginot Line and if iron ore deliveries to Germany were prevented it would have a severe effect on the German war economy. The British would have to carry the naval burden and a few thousand troops of the French Foreign Legion would show the French government's determination to fight. Admiral Gabriel Auphan, the Deputy Chief of the Maritime Staff (Sous-chef d'état-major des forces maritimes) wrote later,
and the Prime Minister, Edouard Daladier, wanted swift action. The Norwegians had been warned in January and could be ignored during a "swift occupation of the main Norwegian ports and landing of an expeditionary force". Having decided to wait, the British on 1 March resolved to try to obtain permission from the Norwegians and the Swedes to allow the transit of a military force to Finland via Narvik, Kiruna and Gällivare but the Norwegian prime minister rejected the request on 4 March, the Swedish prime minister having rejected the request the day before. On 11 March the French told the War Cabinet that Daladier would be forced to resign over the Finland question, unless something was done. The British agreed to dispatch troops to Narvik regardless of whether the Norwegians acquiesced.[8] Plan R3 Satellite photograph showing ice in the northern Gulf of Bothnia In Plan R3, Major-General Pierse Macksey, the commander of the 49th (West Riding) Infantry Division, was made land commander and Admiral Edward Evans the naval commander, with Audet in command of the Corps éxpeditionnaire français en Scandinavie. The British commanders were briefed on 12 March that they were to land a force at Narvik, assist Finland and deny Russia and Germany the Swedish iron ore fields for as long as they could. The force was only to attempt a landing if the Norwegians made only token resistance. Force was not to be used except in self-defence. The plan caused confusion in the War Cabinet because several partly-trained British divisions were to be imposed on Norway and Sweden.[9] Reaching Finland was unlikely and the force might have to re-embark if the Norwegians resisted. During 12 March the War Cabinet decided only to implement the Narvik landing and seize the railway terminus. On 13 March the embarkation began, only to be cancelled that day on the news of the Finnish capitulation to the USSR. Churchill and the Chief of the Imperial General Staff, General Sir Edmund Ironside tried to get permission to land at Narvik but were rebuffed, most of the troops for Operation Avonmouth being sent to France and the Chasseurs Alpins sent to their base. The French ships resumed their normal duties and the British ships went back to the Northern Patrol.[9] Operation Royal MarineBy late March 1940, after the resignation of Daladier and the appointment of Paul Reynaud as prime minister of France, at the Supreme War Council, Chamberlain presented Operation Royal Marine, a scheme to put floating mines into the Rhine to disrupt river traffic downriver in the Rhineland. The French agreed to the plan provided that it was linked to mining operations in the Norwegian Leads. By 1 April a warning would have been sent to the Norwegian and Swedish governments that the Allies would stop the passage of German iron-ore ships. A few days later mines would be laid in the Leads and operations against German shipping would be undertaken as floating mines were to be placed in the Rhine and other German rivers. Churchill and Ironside managed to get a decision that British and French troops were to go to Narvik and advance to the frontier with Sweden. The French Admiral Darlan saw the landing plan as a catalyst to bring out the German fleet and sent orders that the French forces which had just been disbanded to be reassembled; the War Office began to gather the forces that had dispersed after the cancellation of Operation Stratford and Operation Avonmouth.[10] German plansOn 3 April, the British began to receive reports of an accumulation of shipping and troops in the Baltic German ports of Rostock, Stettin and Swinemunde. It was assumed that it was part of a force being sent to counter an Allied move against Scandinavia (the Germans had some awareness of Allied plans as a result of their own intelligence) and so that day, the British took the decision to proceed with the mining of the iron ore route separately from Operation Royal Marine, setting a date of 8 April for the Admiralty to implement it. PreludeOperation WilfredThe mining plan became Operation Wilfred and the new landing operation Plan, R4. Force WV, consisting of four destroyer minelayers and four escorting destroyers was to lay mines off just south of the Lofoten Islands in Vestfjorden (67°24'N, 14°36'E) in the channel leading to Narvik. Force WS, the auxiliary minelayer HMS Teviot Bank and four destroyers was to lay mines off Stadtlandet (62°N, 5°E). Force WB, with two destroyers, was to lay a dummy minefield off the Bud headland, south of Kristiansund (62°54'N, 6°55'E) if the Norwegians swept the mines, they were to be replaced by the minelayers.[11] Plan R4The British anticipated that Operation Wilfred would prompt German retaliation and Plan R4 was a scheme to forestall German landings by occupying Stavanger, Bergen, Trondheim and Narvik as soon as the Germans revealed their intentions. Brigadier C. G. Phillips and two battalions of infantry for Bergen and two for Stavanger embarked at Rosyth on 7 April in the cruisers HMS Berwick, York, Devonshire and Glasgow.[12] Troops for Narvik were assembled on the Clyde to commence embarkation on the morning of 8 April, to depart later in the day, in six destroyers, escorted by the cruisers HMS Penelope and Aurora; Admiral Evans and Major-General Mackesy on Aurora. Although waiting on the Germans conceded the initiative, sixteen submarines were sent to patrol the likely German approach routes to give warning.[11] An infantry battalion bound for Trondheim was due to follow on 9 April. Plan R4 expected that the British troops would be able to hold their positions until reinforced.[12] Operation On 3 April, the cruisers Berwick, York, Devonshire and Glasgow with the destroyers HMS Afridi, Cossack, Gurkha, Mohawk, Sikh and Zulu embarked their troops at Rosyth to be transported to Norway for Plan R4.[11] Additional troops embarked onto transport ships in the Clyde with other troops, held in readiness until evidence of German intentions gave a pretext to send them to Norway. On 5 April a large force of warships, escorted by the battlecruiser HMS Renown and the cruiser HMS Birmingham, comprising elements of Operation Wilfred and Plan R4 set out from the main British naval base at Scapa Flow for the Norwegian coast. On 7 April, the force split, one to carry on to Narvik, the others to carry out Wilfred to the south. If the Norwegians swept the minefields, the British would lay new ones close by. If the Norwegians challenged the British ships, the latter were to inform them that they were there to protect merchant vessels. The British would then withdraw, leaving the Norwegians to guard the area.[13] As Force WS sailed for Stadtlandet on 7 April, German ships were sighted in the Heligoland Bight on passage to Norway and the mine laying was cancelled. Early the next day, 8 April, the day scheduled for Wilfred, the British government informed the Norwegian authorities of its intention to mine Norwegian territorial waters. Soon afterwards, Force WB simulated mine laying off the Bud headland by using oil drums and patrolled the area to "warn" shipping of the danger. Force WV laid the minefield in the mouth of Vestfjord. At 05:15 that morning, the Allies broadcast a statement to the world that justified their action and defined the mined areas. The Norwegian government issued a strong protest and demanded their immediate removal; the German fleet was already advancing up the Norwegian coasts.[citation needed] Later that day, the ore carrier Rio de Janeiro, sailing from Stettin, in northern Germany was sunk in the Skagerrak by the Polish submarine Orzeł. The ship was carrying troops, horses and tanks for the German invasion of Norway, part of Operation Weserübung. Around half of the 300 men on board were drowned, survivors telling the crews of the Norwegian fishing boats that picked them up that they were on their way to Bergen to defend it from the British.[14] AftermathAnalysisOperation Wilfred was complete, the southern ships of Force WS and Force WB rejoined the Home Fleet and took part in Operation Rupert, British operations against the German invasion of Norway. Force WV to the north confronted the German landings. The Norwegians were taken by surprise by the German invasion on 9 April, which began with German landings in the Norwegian cities of Stavanger, Oslo, Trondheim, Narvik and Bergen. British and French troops landed at Narvik on 14 April to assist the Norwegians, pushing the Germans out of the town and almost forcing them to surrender. Despite Allied landings between 18 and 23 April, the Norwegians surrendered on 9 June 1940. Operation Wilfred failed to cut off iron ore shipments to Germany but for the rest of the war British ships and aircraft could enter Norwegian waters and attack German ships at will.[citation needed] Subsequent eventsHMS Glowworm (Lieutenant-Commander Gerard Roope), had become detached from the main force on 6 April to look for a man lost overboard and encountered the German heavy cruiser Admiral Hipper. Glowworm carried out a torpedo attack and after receiving return fire and suffering severe damage, she rammed Admiral Hipper, sinking soon afterwards, with the loss 111 men; Roope was awarded a posthumous Victoria Cross.[15] Renown, which had diverted to assist Glowworm, fought the Action off Lofoten with the German battleships Scharnhorst and Gneisenau 80 nmi (150 km; 92 mi) off the coast. The Germans disengaged from the battle, drawing Renown and her escorts away from the German landings at Narvik.[16] The 2nd Destroyer Flotilla, which had taken part in the mining of the Vestfjord, took part in the First Naval Battle of Narvik (10 April).[17] Icarus captured Alster (11 April) and took part in the Second Naval Battle of Narvik (13 April 1940).[18] British order of battleHome Fleet
From Rosyth, 7 April
From Rosyth, 8 April
Covering force
Force WV (Mouth of Vestfjord)
Force WS (Stadtlandet)
Force WB (Bud headland)
See also
Notes
Footnotes
References
Further reading
|
||||||||||||||||||||||||||||||||||||||||||||||||||||||||||||||||||||||||||||||||||||||||||||||||||||||||||||||||||||||||||||||||||||||||||||||||||||||||||||||||||||||||||||||||||||||||||||||||||||||||||||||||||||||||||||||||||||||||||||||||||||||||||||||||||||||||||||||||||||||||
